The Electric Accordion
Disclaimer: if you happen to attempt reproducing what I've
described below, any resulting damage, material or immaterial, is
your own responsibility. In any case your warranties for the
equipment involved will probably be voided. Otherwise, have fun!
Background
Recently I've become interested in macro photography. I
started out with a Soligor extension tube set, but when offered a
PB-4 bellows for a decent price I couldn't resist.
While I could use the bellows with my manual focus Nikon body
without a problem, the fact that the digital body which I have,
the D100, was intentionally crippled by Nikon (as it doesn't do
any sort of exposure metering without a CPU-equipped lens)
discouraged me from trying out the bellows with it. I'm still so
much an amateur that I have my hands full as it is, never mind
trying to calculate macro exposure in my head when taking a
picture! I wanted TTL measuring, just like I have with my
FM2n. However, getting one of the pro digital bodies, such as D1X,
which can do spot and centerweight measurement with manual lenses,
was out of the question due to their price.
As it happens, Rolland
Elliott found out some years ago that you can insert a CPU
chip to an old manual focus lens and have a perfectly functioning
exposure measurement even with Nikon's feature-stunted consumer
bodies. He offers a cheap service to convert many, but not all,
lenses, and he doesn't do bellows at all as far as I know. Then, I
started to read Bjřrn
Rřrslett's pages. He had got the idea of installing a chip
into an extension ring, to use some very esoteric lenses -- and
bellows just as well. Now this started to look like something I
could do just as well...
Implementation
First, I had to do the gathering of the necessary parts. For
the chip, any chip would do, as the camera would not be in control
of the lens aperture on the other side of the bellows -- any
reported aperture will be fine, aperture will be controlled by
manually stopping down (the lens will just make the camera
think it suddenly got darker and lengthen the exposure time
correspondingly). As I'm not a pro photographer or a camera
repairman, I didn't even bother to try to order parts from Nikon
directly. I went around the local camera shops, as well as repair
shops, trying to look for cheap, broken AF lenses. Absolutely no
luck there -- only a friendly, or in some cases unfriendly (after
explaining what I wanted the thing for) 'no, we don't have them
around'. Dang, don't those plastic Nikkors ever break?
Finally, I gave up and bought a functioning IX-Nikkor zoom
(a 60-180 f4.5-5.6) for about 40 euros. A bit expensive,
but I wanted to go ahead with the project! When I got home, I
showed it the screwdriver and it promptly fell to pieces (no,
really, one of the major construction elements was sticky black
tape!). The chip print was actually surprisingly large, due to
the two long contact strips which would convey the focal length
and the focussing distance. That worried me a bit, but they seemed
to be foldable.
I decided I'd sacrifice one of the Soligor tubes (the 20 mm
one) for the purpose; it'd be easy enough to get a replacement if
I needed it. I decided on the 20 mm tube for two reasons. First,
the less extra extension would be introduced, the better -- you
can always add some more, but to take any away is
impossible. Second, from the three-tube set the 20 mm was the one
which seemed it would actually manage to house the chip without
much violence to the electronics! Then, off to work it was!
Gutting the extension ring
First I took the selected ring apart non-destructively to see
whether the chip really would fit in. A problem with the Soligor
set is that it's made of plastic -- to enhance the structural
strength, the inside of the tube is not at all smooth but full of
little strengthening ribs. However, it still seemed that with a
bit of tucking and pushing in the chip would fit.
I decided to discard all of the mechanics which I possibly
could, meaning the AF screw, the aperture lever, and the lever
which conveys the lens speed index. All of these would be useless
on the bellows. I had to leave the meter coupling ridge bit in
place, because it also blocks light from entering the ring.
After that, the insides of the ring contained a lot of
unneeded metal which probably just induces vignetting (heh)
so I decided to grind it away with a Dremel.
Installing the chip
This was, in my opinion, the only tricky part in the whole
operation. You have to get the electronic contacts of the chip
aligned just right, so that they mate with the camera properly
when the bayonet locks into place. I decided to use a decidedly
low-tech technique for this: mount the loose male bayonet into the
camera, press the chip into position with fingers and mark the
position on the bayonet with sticky tape. Then, take the bayonet
out and drill the holes for the screws. Worked like a charm --
except that the first time 'round, I managed to slip the chip 2 mm
to the side before marking the position. Groan.
Fortunately, I managed to make the second set of holes without
problems.
The main electronics of the chip just fits when the
extension ring is reassembled, but the aforementioned contact
strips required a bit of work. I managed to tuck them here and
there, though not very cleanly.
Below you can see a couple of pictures of the result.
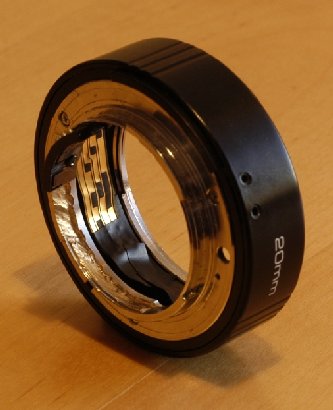
Fig.1. Here you can see one of
the contact strips, held in place by sticky tape, what
else. To reduce internal reflections, I inted to cover the
inside with matte black material. The grinding marks are a
bit ugly, but then again, it's not a beauty contest
here. |
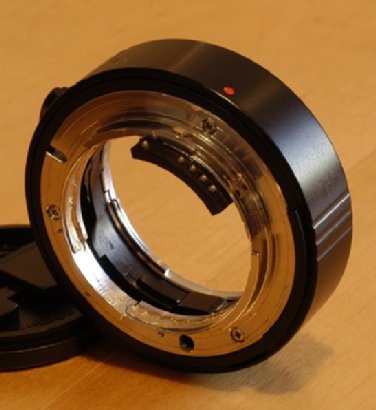
Fig.2. Another view, showing
more removed brass grind marks and the installed contact
block more clearly. |
Operation
After putting everything together, I used -- cautiously as ever
-- my F65 as a guinea pig. Mount the ring, turn it on, and
YAY! My neighbours must've wondered at my rejoicing. An
aperture showed on the camera, the light meter would respond --
perfect! And on the D100 it worked just as well!
The maximum aperture that happens to show is f5.3. After
checking from the EXIF information, the focal length reported by
the camera is 95 mm. Both are, as far as I can say, due to the
fact I did not short the zoom contact strip at any particular
position; apparently when the chip gets all zero bits from the
strips, the above numbers are what it maps to. If you really want
to, you can probably debug what gives what values by connecting
the chip to the camera and poking the metal forks, which slide
over the contacts, from the lens into different positions. I
didn't consider it worth the trouble; the only problem that might
arise would be in conjuction with flash (distance information
for D-TTL purposes would be all wrong) by I've yet to try that
out.
Note that the aperture on the camera has to be at the maximum
value, as there is no way the camera can control the aperture of
the lens at the other end of the bellows (and I took the lever
coupling away, anyway). Otherwise the pictures would be
overexposed. Good old stop-down together with TTL metering will
determine the right exposure when the camera doesn't try to close
the aperture. Note also that the same reason, lack of aperture
control, will prevent using S or P modes -- just M and A are
available, but that's what I always use, anyway.
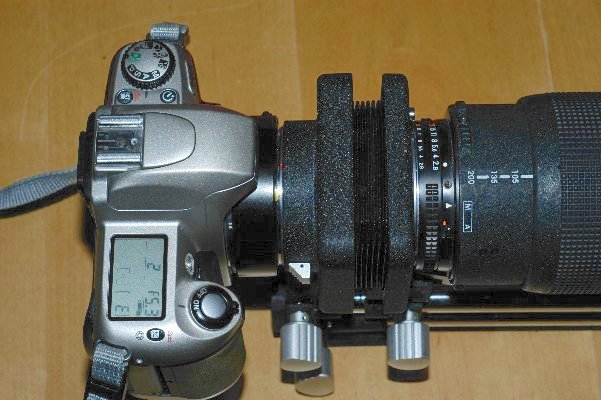
Fig.3. Playing the accordion on
the F65. The 'E' on the camera indicates lack of film, in
case you were wondering...
|
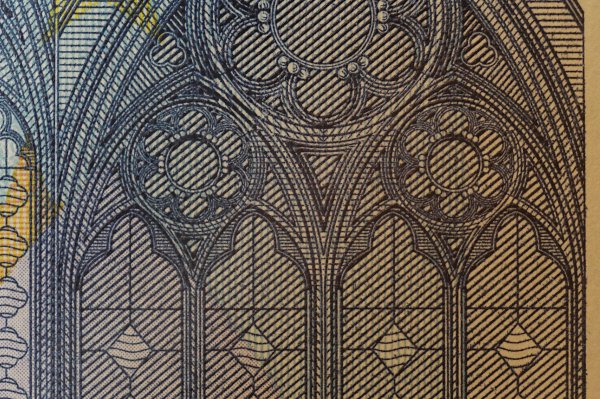
Fig.4. Finally, a demo
picture; taken with a 80-200 at 80 mm position and an added
extension of 20+60 mm. The subject is a detail from a 20
euro banknote. White balance is a bit off (evening sun
plus incandescent lamp) but nevermind. |
Conclusions
I took one or two evenings to examine the parts, and another
two evenings to actually do the work. I intentionally worked
slowly not to make too many mistakes; the one I did was not fatal,
which is an accomplishment in itself since when it comes to
mechanics I'm basically all thumbs! Add to that 40 euros for the
IX lens, and about the same for the 20 mm ring; in the end it's
not such a huge investment. After all, what photographic equipment
do you get for 80 euros? A couple of filters, maybe. So, in my
opinion, it was well worth the trouble!
References
- Rolland
Elliott's homepage. As far as I know, he started the whole
thing of chip upgrading a few years ago.
- Bjřrn Rřrslett's
homepage. In addition to lots of good information on
chipping, he has a wealth of information regarding IR and UV
photography, as well as very fair and reasonable lens reviews.
- Nikon
F-mount index by Lars Holst Hansen; basic information on the
Nikon bayonet mount.
- PN-11
Electrification for Dummies; another sort of electrification
project by Damien Douxchamps. By the way, his Kenko tube
looks just like mine which is branded Soligor, inside and
out. Must be the same product.
Copyright (c) Hannu Mallat < hmallat at gmail dot com > 2004. Last updated Jun 11, 2004.